Dominate your Super Bowl party with these “Kickin” Hot Wings

Honey Habanero Hot Wings Recipe

The Super Bowl is this Sunday. It seems like it really snuck up on me this year. Part of the reason is probably due to how busy things have been at work lately, but I have a sneaking suspicion that the weather has a lot to do with it too.  Living in Chicago, this time of year is typically cold and when I say cold I’m not talking about the kind of cold that you can solve by putting on another blanket. I mean the type of cold that will freeze you eyelashes together if you’re outside a bit too long (trust me on this one. I learned this the hard way), but this year has barely dipped below freezing and we’ve even had a few “spring-like” days.

However, no matter what temperature it is outside, I can always go for a good plate of “kickin” hot wings –hehe you see what I did there?- especially for the Super Bowl. This recipe comes directly from award winning chef, David Cordua.  His honey-habanero chicken wings do any amazing job of balancing the sweet and spicy to create an explosion of flavors that I can’t get enough of. The combination works so well with the rich buttery sauce and adds just enough acid to add not only brightness to the sauce but it also cuts the richness of the dish.  Let me tell you, after trying these delicious little beauties I can definitely see why the guy wins awards.

Oh, and just a reminder, you’ll probably want to wear rubber gloves when working with habaneros. They are so spicy and potent that you can seriously injure yourself just by handling the peppers and then coming in contact with your eyes or any cuts in your skin.

Ingredients:

Habanero–Honey Sauce:

  • 1/2 cup lime juice
  • 1/4 cup white wine vinegar
  • 5 medium (about 1 1/2 ounces) habanero peppers, stems removed
  • 1 teaspoon salt
  • 2 sticks butter
  • 1/2 cup honey

Tempura Batter:

  • 1 cup all-purpose flour
  • 1 cup cornstarch
  • 1 tablespoon baking powder
  • 1 tablespoon salt
  • 2 cups water
  • 1 cup ice

Seasoned Flour:

  • 3 cups all-purpose flour
  • 2 tablespoons salt
  • 2 tablespoons paprika

Wings:

  • Peanut or canola oil for frying
  • 2 pounds whole chicken wings, drumettes and wings separated and tips removed

Method:

To make the habanero–honey sauce:

Start by combining the lime juice, vinegar, habanero peppers, and salt in a blender and purée until smooth. Then strain through a sieve or fine mesh and toss the solids. In a large saucepan melt the butter over medium heat and cook until golden brown, about 8 minutes. Pour the brown butter into a medium bowl and whisk in the honey and a tablespoon of the habanero vinegar that you just made. Taste it and add a little more if you’d like the wings to be extra spicy. Feel free to store the remaining habanero vinegar in the fridge for later use as you won’t need any more of it for the recipe.

To make the tempura batter:

Whisk the flour, cornstarch, baking powder and salt in a large bowl to combine and ensure uniformity.  Add the water and ice; mix well and set aside.

To make the seasoned flour:

Mix together the flour, salt and paprika in a large bowl and set aside.

Cooking the wings:

Heat about 6 inches of frying oil to a deep pot until it reaches 350°F.  While the oil is heating up, prepare the wings for frying: dip one wing in tempura batter. Shake off any excess batter, then coat in seasoned flour. Place the wing on a baking sheet. Repeat with the remaining wings.

Working in batches, fry the wings until golden brown, about 4 to 5 minutes. If you have too many wings in the pot at one time then the temperature of the oil will drop too much and you will have really greasy wings. Transfer the fried wings to a paper towel–lined plate or baking sheet.

Whisk the habanero–honey sauce again to make sure everything is well combined and toss in the wings to coat.  Serve on the platter of your choice and enjoy!

Categories: Recipes | Tags: , , , , , | 2 Comments

How to Make Your Own Hand-Pulled Mozzarella

homemad buffalo mozzarella recipe

I know that people have been making mozzarella cheese for hundreds of years. The thing is though, that I never really thought it was something that you could make at home.  I had the image in my mind of milk maids stirring for hours over hundred gallon vats of boiling milk, being hot and uncomfortable, slaving away to make such a wonderful cheese.  Honestly, with imagery like that stuck in my head, can you blame me for thinking that making artisan cheese would be darn near impossible to attempt, let alone master?

Well, I’m happy to report that hand-pulling your own mozzarella is not only fun and easy, but incredibly delicious as well! I’m drooling just thinking about my latest batch.  Best of all, you can find everything you need at your local Whole Foods or other similar gourmet/health food store.

homemade mozzarella recipe

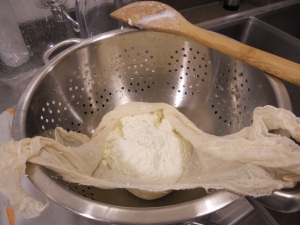
After heating the milk the first time, the cheese curds look just like tofu!

homemade mozzarella recipe: curds

After the second cook, just strain them into your cheesecloth. Its starting to look like real cheese now, huh?!?!?

homemade mozzarella recipe

This is the part that makes your mozzarella look and feel like mozzarella. After straining the curds, dump them in the hot water and let them sit awhile until nice and hot.  The curds will start to melt together and form the tasty cheese we all know and love.

homemade hand pulled mozzarella recipe

Yield: about ¾ to 1 pound

¼ teaspoon liquid rennet
¾ cup cool water, divided
1-1/2 teaspoons citric acid
1 gallon milk (make sure it’s not ultra-pasteurized)
cheese salt (or very fine sea salt) to taste
3 tablespoons heavy cream

In a small bowl, mix liquid rennet into ¼ cup cool water and set aside. In different bowl, mix citric acid into the remaining ½ cup cool water, stirring well to dissolve the citric acid and set aside.

Place milk in a heavy pot. Pour in the citric acid solution and stir vigorously to mix well with the milk. Place the pot over high heat and continue to stir while heating the milk to 90 degrees F. When the milk reaches 90 degrees, remove the pot from the burner immediately and slowly stir in the rennet solution in one direction for 30 seconds. Cover the pot and leave it undisturbed for 5 minutes.  (it will not curd if heated over 98 degrees)

After 5 minutes, check the curd, which should look tofu, with a clear separation between the curd and the whey around the edges of the pan. To do this, take the back of your spoon and very gently press down on the curd at the edge of the pan. If the curd is too soft or the whey is milky, let it set for a few more minutes. If your milk did not form a curd, you may have try a different brand of milk. Sometimes the milk is ultra-pasteurized, but it won’t say so on the label. When buying your milk, avoid buying any brand with an extra long shelf life.

With a knife that is long enough to reach the bottom of the pot, cut the curd into ½ – ¾ inch squares, creating a checkerboard pattern to encourages uniformity in the formation of the curd.

Place the pot back on the heat and heat to 110 degrees while slowly and gently moving the curds in one direction with your spoon. Remove from heat and continue slowly stirring for 2 to 5 minutes (I like mine stirred for about 2-1/2 minutes so the texture is silky). A longer stirring time produces a firmer cheese. Ladle the curds into a colander or strainer lined with a pre-moistened cheese cloth, discarding the whey. At this point, you may place your curds in a plastic bag and store in the refrigerator for 2 to 3 days before stretching the mozzarella.

When ready to stretch, heat a pot (or crock pot or SousVide machine) of water to 185 degrees. Place the curds in the hot water, and let sit for 3 to 8 minutes. Remove the curds and using rubber gloves if needed,  fold and knead the curd until it starts to become smooth, elastic and begins to stretch. If the curd does not stretch like taffy,put it back into the hot water since the curd must be at least 135 degrees to stretch properly. While stretching, knead in salt to taste.

Form into 3 inch balls and your set! You can serve it as part of a meal, an appetizer or on its own. If you decide to have it on its own, try putting out different flavors of salt to mix things up. Mmm. I really like a light sprinkle of pink Himalyan sea salt.

Categories: Chef Tips, DIY, Recipes | Tags: , , , | 4 Comments

How Does One of the World’s Greatest Chefs Roast Chicken?

The Bests Roast Chicken Recipe

There it is, in its lemony, buttery juices, British chef Simon Hopkinson’s Roast chicken, the star of his book “Roast Chicken and Other Stories.” And one of my favorite recipes. (S. Irene Virbila\Los Angeles Times / December 7, 2012)

There is something magical about roasted chicken. It’s succulent and juicy and everyone loves it.  After all, have you ever been to a dinner party, or grandma’s house for that matter, where roasted chicken was served and anyone passed on it? My guess is no.  Of course, like anyone, I’ve had my fair share of roasted chicken that was under seasoned or the skin was icky instead of crispy. That will make even the most impassioned chicken devotees cringe and having experienced the sad side of this dish, it’s easy to see why someone could be nervous, intimidated even, to prepare a perfectly roasted chicken.  Never fear, I’m about to share with you one of the world’s greatest chef’s recipes for roast chicken.

No, I’m not talking about me, but thanks for guessing. J  I’m talking about Simon Hopkinson, celebrated critic, cookbook author and arguably Britain’s greatest chef. Simon’s recipe, from his book “Roast Chicken and Other Stories” calls for only a few of the basics, namely: butter, lemon, salt, pepper and thyme or tarragon.  I prefer to use thyme since my mom is not a fan of tarragon, but that is a personal choice and you can feel free to try a combination of the two if it pleases you.

The beautiful thing about this recipe is that the flavors of the lemon and spices permeate the meat. So, you can taste the aromatics in every bite while the butter keeps the meat moist and helps to crisp the skin.

Here’s Hopkinson’s recipe:

4 ounces room temperature butter
4 pound whole chicken
Salt and pepper
1 lemon
Several sprigs of thyme or tarragon, or both!
1 garlic clove, peeled and crushed

Preheat the oven to 450 degrees. Smear softened butter over the entire bird making sure to get the front and back.  Put in a roasting pan. Season liberally with salt and pepper, remember that you need enough to season the meat all the way to the bone, not just the skin.  Squeeze the lemon juice over the bird, this will also make some of the salt and pepper to wash off, but most should remain in place. Put the herbs, garlic and the lemon halves into the cavity.

Roast the chicken for 10 to 15 minutes. Baste, then turn the oven down to 375 degrees and continue roasting for 30 to 45 minutes more.  Feel free to baste occasionally, but be aware that the more often you open the oven door the more heat escapes and it may take longer to finish roasting. When done, the chicken should be golden brown with crisp skin with lots of nutty brown juices in the bottom of the pan. Turn off the oven, leaving the door ajar, and leave the chicken to rest for at least 15 minutes before carving. Serve with the juices.

Categories: Recipes | Tags: , | 6 Comments

5 Chef Tips on How to Roll Dough Evenly

how to roll dough evenly

With cookie season right around the corner, I thought that it would be the perfect time to share my tips on how to roll dough evenly. After all, if the cookie is skinny on one side and the other side is fat it will bake unevenly which usually means half of it is burnt.  That is one hot cookie mess that you just can’t hide, no matter how creative you get with decorating and like the saying goes “you can put lipstick on a pig, but at the end of the day it’s still a pig” even if it’s a really cute pig. *smiles*

Okay, so we know that we don’t want our cookies (or pie dough or tarts, or whatever) to come out wonky, but how do we make sure that we roll our dough evenly?  Fortunately, I’ve put together some tips to make sure that you have perfect dough every time. Of course, I’ve thrown a couple cheats in there as well too because sometimes you’ve just got to have things perfect right away and you don’t have time to practice beforehand.

1.    Start with a cool flat surface.  Because most countertops tend to stay cooler than the ambient room temperature, it is the perfect start for rolling out your dough. You can just throw a bit of flour on the clean countertop and begin. However, I like to lay down a silicon mat first. I find that it makes it so that I have to use even less flour and its much easier to clean afterwards.

2.    “Super Secret Tip” When working with a stickier dough, these are typically ones with a higher sugar/moisture content, then you want to roll the dough out between two sheets of waxed paper. It helps keep the dough smooth and makes it so that you don’t need to use much additional flour.

3.    Make sure that the dough is thoroughly chilled before rolling. This makes the dough much easier to roll out. It also helps solidify the fats in the dough making pies flakier and helps prevent cookies from spreading to much during the baking process.

dough2

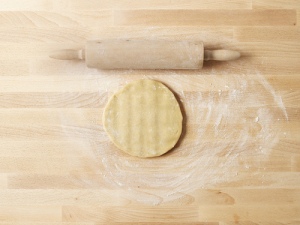
4.    Start in the middle and press evenly as you roll the dough. Although it’s tempting to start rolling at one end and go all the way to the other, this will not only cause the dough to bunch up but it’s very difficult to maintain even pressure this way.  However, beginning in the center of the dough and rolling out and then returning to the center and rolling towards you gives you more control.

5.    Don’t be afraid to use guides.  Rolling out even dough is an art form and can take many attempts to perfect.  With that being said, it’s okay to use rolling guides. These are basically just two different pieces of plastic or metal of the same thickness that you place on either side of your dough.  What you basically do is just roll out your dough until the rolling pin hits the guides on both sides. This way you know that your dough is even.  You can find these guides available at specialty baking supply stores. However, you can pick up wooden or metal dowels at the hardware store at any thickness you like and they will cut them to your desired length for free. This should only run you a couple bucks versus paying $15 or so for basically the same thing at the kitchen supply stores.

Hopefully, these tips will be able to help you out and “keep on rollin’ baby”!

gingerbreadmen

Categories: Chef Tips | Tags: | 12 Comments

An Apple Pie Martini a Day Keeps the Doctor Away, Right?

recipeThanksgiving is my favorite holiday. I love getting together with family and friends and just enjoy a day of laughing, eating and of course drinking. For days afterward, I’m relaxed and recharged, but that post-holiday high only lasts so long and soon I find myself needing a tasty adult beverage. Since I’m still doing my best to hang on to the last thread of Thanksgiving excitement, my drink of choice is a Hot Apple Pie Martini.

This recipe reminds me so much of my favorite holiday dessert. The use of apple cider instead of apple juice allows more of the true apple flavor to come through and it is enhanced by the warmth of the cinnamon and the vanilla vodka. It completely blows those “appletinis” you see at every restaurant and lounge out of the water…and you made it at home!

Super yums!

Hot Apple Pie Martini Recipe

Ingredients

2 oz vanilla vodka

1 1/2 oz apple cider

1/2 oz honey

1/2 oz lemon juice

1/2 teaspoon cinnamon

optional: apple slice for garnish

Directions

In a martini shaker filled with ice, combine ingredients and shake well. Strain into a martini glass. Garnish with a thin slice of apple.

Categories: Recipes | Tags: , , | 13 Comments

Don’t Be Shellfish! 5 Tips for Buying the Best Oysters, Clams, Mussels & Scallops

Image

Bill and I have been away from home on business this past week and the way it looks, we are probably going to be away from home for another week and a half. So, we’ve decided to check out some local restaurants and have a little fun discovering a new town.  Friday night we decided to try the place across the street from our hotel. I have to admit, that we thought it was going to be a dive bar and we initially decided to try it out because it was so close and we were pooped from a long day. However, once we set foot inside the restaurant we knew it was going to be a fun night. The music was great and the place was packed. When we got our seat and saw the menu, Bill’s eyes grew wide the second he saw scallops on the menu.Image

They have got to be one of his favorite foods and they are also one of the things that we have been meaning to make at home for awhile. However, since we’ve moved away from Chicago to the suburbs, we haven’t taken the time to go to the fish market and our plans of searing up some amazing diver scallops keep getting postponed.

In the meantime though, I’ve decided to compile a list of my tips for buying the best shellfish: oysters, clams, mussels and scallops.  These tips served me well when I used to have the chance to visit the fishmonger and I hope that they can help you out as well. The main thing to remember is that most of the hard work that goes into an amazing shellfish meal is in finding high quality shellfish.  Fortunately, the same rules apply to most types of shellfish. However, scallops are a different story since they are usually sold out of their shell.

How to Buy the Best Oysters, Clams, and Mussels

The main thing that you want to remember when purchasing oysters, clams and mussels, is that you want them to be alive. That’s because they go bad really quickly otherwise. The following guidelines are mainly things ways to tell if they are still fresh.

  • The shells should be tightly closed (an open shell means that its dead)
  • The shells should have no cracks or chips
  • They should feel heavy for their size
  • They should smell like the ocean, not at all “fishy”
  • When cooked, they should open, throw out any that stay closed

For those of you looking for tips on shucking oysters, here’s the link to a great video with lots of tips.

What to Look for when Buying Scallops

Because scallops are usually sold without the shell, the typical rules don’t apply. So, you’ll have to inspect the protein itself instead of just the shell.

  • Diver scallops are generally thought to be the best quality
  • They should smell of the ocean, not at all “fishy”
  • They should not smell of iodine (a sign of rot)
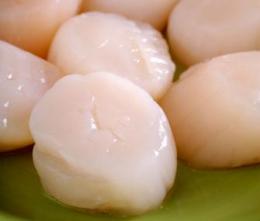
  • They should be a translucent white and firm
  • Look for “dry” scallops, which means they haven’t been brined, to ensure a good sear. The “wet” or brined scallops are best used in sauces, soups and other preparations

I hope that you’ll be able to use these tips to try making some amazing shellfish cuisine at home and let me know how these tips worked out for you or what your favorite shellfish dish is.  Bill’s is obviously scallops and I think that mine might be an oyster bar.

Categories: Chef Tips | Tags: , , | 4 Comments

Top Chef Host, Padma Lakshmi Shares Her Recipe for Cardamom Cappuccino

Top Chef's Padma Lakshmi's recipe for cardamom cappuccino coffee

Top Chef has got to be one of my favorite shows of all time. Its still one of the only shows that I will watch live and suffer through the commercials for instead of waiting for the dvr to record it.  For some reason I just need to know what happens at the same moment the rest of the world does.  In fact, I love it so much that I tried to throw Top Chef themed get togethers at my old apartment before I got married.  The idea was that my friends and I would get the recipe from the winning dish from the week before and host a get together at their home and prepare the dish. Unfortunately, none of my friends were really into cooking as much as I was. So, it the idea sizzled out quickly.

Since I’m already hard wired to search for anything Top Chef related, I was ecstatic when I saw that PopSugar posted Padma Lakshmi’s recipe for cardamom cappuccino.  I guess I’m living vicariously through her, but really, can you think of a better chef/model/role model?  Anyways, apparently Padma has teamed up with Nespresso and has created her recipe specifically around their Indriva from India flavored Nespresso pod. However, it’s really simple to use a regular espresso or drip coffee instead.

Padma recommends making this recipe with milk and as much spice as you like.  “the cardamom has a fantastic aroma, and it really makes you feel cozy,” Padma said, and is perfectly paired with dark roasted coffee and nutmeg. “Something about the aroma of the nutmeg and cardamom really smacks of Fall. It makes you wanat to stay in, build a fire, and just get together and entertain at home. I think it’s the perfect coffee drink, either for morning or after dinner.”

Of course, after hearing a description like that, I knew I had to try it.  The only thing is, that I don’t have an espresso maker, which has never really been a problem for me as I’ve been making espresso with a French press for years. The only thing that takes some ingenuity is how to make that delicious foam.  Well, fortunately, it’s much easier than you’d think to make foamed milk without a frother.

CARDAMOM CAPPUCCINO
From Padma Lakshmi

Ingredients

1/2 cup extra strong regular coffee, 2 shots espresso, or 1 lungo pour (4 ounces) Nespresso coffee, such as Indriya of India, brewed
1/2 cup dairy or nondairy milk
1/2 teaspoon raw sugar
1/4 teaspoon ground green cardamom
Pinch of raw, unsalted almonds, crushed
Pinch of nutmeg

Directions

  1. Pour the prepared coffee into a cappuccino cup.
  2. In a milk frother or in a saucepan over the stove, heat milk, sugar, and cardamom.
  3. Pour heated, spiced milk over the coffee. Top with milk foam, if using a milk frother.
  4. Garnish with almonds, a tiny pinch of nutmeg, and a larger pinch of cardamom.

Makes 1 cappuccino.

Categories: Recipes | Tags: , , , , , | Leave a comment

Frothers, Who Needs ‘Em? How to Foam Milk without a Steamer

How to froth milk without a steamer

With a high of 53 degrees, I think its time that I finally admit that fall is here.  Good bye to the days of sitting on the porch and drinking iced teas and chilled fruity drinks. There is a bright side to the cooler weather though and that is hot coffee! Whether its straight black or with cream, whether its brewed in a French press at home or a $4 cappuccino at Starbucks I know that I will love it.

Now that the weather is dropping, I’ve been pulling out my recipes for warming beverages and the one thing that I’ve noticed is that most of them call for foamed .  I don’t know about you, but a separate machine just for frothing milk isn’t high on my list of must buys.  So, I wanted to share an easy trick that I’ve been using for the past few years on how to froth milk using a jar and the microwave that I learned from thekitchn.

Ingredients
Fresh milk

Equipment
Small jar with a tight fitting lid
Microwave oven

  1. Fill a small, microwaveable jar with enough milk for your coffee making sure that it doesn’t fill the jar more than halfway up. This will allow room for the foam to expand.
  2. Seal the jar and shake as hard as you can for the milk to foam up, around 30 seconds.
  3. Take the lid off and microwave for about 30 seconds to heat it up.
  4. Using a spoon to hold back the foam, barista style, pour the milk into your coffee then finish off by adding the remaining foam on top.

And you’re done! The perfect cup of coffee with foamed milk. Tell me, do you like foamed milk on your coffee drinks?

Categories: Recipes | Tags: , , , , | 2 Comments

Bloody Delicious Dexter Themed Cupcakes for Halloween

halloween cupcakes

Over the past few days, Reddit has been blowing up with images for the Dexter  themed cupcakes that Showtime commissioned Magnolia Bakery to create for the Season 7 premiere party at Grand Central Terminal’s Vanderbilt Hall in NY. It’s creepy and cool at the same time and has completely inspired me to create my own version for our Halloween party this year.

I’m going to take a page from their book and put my own twist on a classic red velvet cupcake complete with shards of sugar glass and blood red simple syrup.  I have to admit that I’m really excited to break out my sugar glass recipes from when I was in pastry school and got to work with sugar and make sculptures. It was one of my favorite sections and since I have such a strong art background, I took to it immediately.  However, time seems to get away from me so easily these days, especially with how work has been consuming mine and my husband, Bill’s lives.  You’d think that since we are chocolatiers and surrounded by treats that I would find time to reignite my passion for chocolate sculpting along with the sugar sculpting.  So, I’m going to make a point of doing it more and more often.

So, I’ve decided to do this by attempting to recreate the Dexter cupcake because they look so bloody delicious!

Fortunately, I have a tried and true recipe for red velvet cupcakes that I adapted from Ms. Paula Deen because anyone who’s anyone knows that when it comes to southern food Paula is the go to lady.

Ingredients

2   large eggs, room temperature
1 cup buttermilk, room temperature
1 1/2 cups vegetable oil
1 tablespoon cocoa powder
1 teaspoon salt
1 1/2 teaspoon baking soda
1 1/2 cup sugar
2 1/2 cup all-purpose flour
2 tablespoon red food coloring
1 teaspoon white distilled vinegar
1 teaspoon vanilla extract

Cream Cheese Frosting:
1 pound cream cheese, softened
2 sticks butter, softened
1 1/2 teaspoon vanilla extract
4 cups sifted confectioners’ sugar

Directions

For the cupcakes:

Preheat the oven to 350 degrees and line a couple of cupcake tins. I usually get about 18 cupcakes from this recipe. In a bowl whisk together the sifted flour, sugar, baking soda, salt and cocoa powder. In a separate larger bowl, use a mixer to beat together the room temperature, liquid ingredients (oil, buttermilk, eggs, food coloring, vinegar and vanilla). Add the dry ingredients and mix until smooth. Note: the liquid ingredients must be room temperature so that the batter doesn’t separate and become oily.

Fill the cupcake liners about 2/3 of the way full and bake for about 20-22 minutes. When done, the cupcake should spring up when lightly pressed and a toothpick inserted in the center should come out clean.

Allow to cool completely before frosting.

Cream Cheese Frosting:

In a large mixing bowl, beat the softened cream cheese, butter and vanilla together until fluffy, 2 to 3 minutes. Slowly add the sifted confectioners’ sugar and on low speed until incorporated. Increase the speed to high and mix until light and fluffy.

For the Blood Red Simple syrup (or raspberry preserves)

1/2 cup sugar
1/4 cup water
red food color

Bring to a boil and use the wooden spoon to stir occasionally until the sugar is completely dissolved, about 2 minutes. Turn off the heat and add food color until you get a blood red shade. Set aside to cool for 5 minutes.

For the Broken Glass

The recipe for the “glass” is essentially one for caramel. The trick is to cook it for a shorter amount of time than usual so it stays clear.

1-1/2 cups granulated sugar
3/4 cup water

Bring the sugar and water to a boil and use a clean wooden spoon (to prevent crystallization) and stir occasionally until the sugar is completely dissolved. In the meantime, heavily spray a cookie sheet with cooking spray. Reduce heat to med high until it begins to barely turn a golden brown color at the edges, a candy thermometer should read 300 degrees. Immediately take off the heat to keep the crystal clear color of your “glass”. Pour the melted sugar onto the pre-sprayed cookie sheet and tilt the pan to spread it to the edges making a thin layer. Work quickly so that it doesn’t cool too fast.  Let cool completely to set. Once fully hardened, the “glass” can be cracked/smashed to make the shards.

Warning: Liquid sugar is very hot and will stick to skin causing severe burns. I recommend wearing rubber gloves.

Categories: Recipes | Tags: , , , | 24 Comments

Babies Eating Lemons

Image

For the past few days, I’ve been trying to figure out what the topic would be for my first post on The Domestic Ingenue.  Would it be an exciting new recipe or an old favorite? Maybe I’ll post about some new entertaining ideas for an Emmy’s party.  I had so many ideas that I didn’t really know where to start.  That was until I saw the most adorable video about babies tasting lemons for the first time. At first I didn’t know if I could laugh, as if there was some connection between me and the little ones and I was worried that they would find out that I was laughing at their misfortune. The thing is though, that the babies’ little scrunched up faces are so funny that you can’t help but smile.  That was when I realized that I wanted to share. To watch the video on YouTube, click here.

Categories: Just for Fun | 3 Comments

Create a free website or blog at WordPress.com.